Tuesday, November 27, 2012

a fresh new look X 2

As you've probably noticed, I've got a new name, a new layout, and along with it a new direction for this blog.  This fall I started a graduate program and I've been struggling to find time to fit nail art into my life.  I love the creative outlet that this hobby provides, but I don't love the time it can take to create a great look.  I realized that I'm probably not the only one out there feeling this way, and I've decided to do something about it!

Welcome, everyone, to 30 Minute Nails, a blog dedicated to nail art that takes 30 minutes or less to create!!

I have had a lot of practice doing my nails, so your results might vary in terms of time and execution.  My goal, however, is for anyone to be able to create the looks on this blog quickly and easily.  This is a challenging idea, but I'm up for it and I hope you are too.  I invite you to send in ideas you have or looks you've seen but have been afraid to try.  I will do my best to reinvent them as simple, easy to recreate manicures.  Please feel free to post comments/pictures or send me ideas at: 30minutenails@gmail.com.


So let's get started!  I just finished my first 30 minute mani (well, really more like 10 minute mani in this case :)) using the "jelly sandwich" technique.


For this manicure you will need:

  1. sheer/jelly polish(es) in color(s) of your choice (I used 3)
  2. 1-2 glitter polishes with clear bases (I recommend polishes with large glitter pieces for this look)
  3. your favorite base and top coats
Here are the polishes I started with
Seche Base, Milani Neon Draw in Pink, OPI Nice Hand...Great Nails, Verity Yellow Follow, Verity Movie Star, Nicole by OPI Make U Smile, and Revlon Quick Dry Top Coat

To get the look above:
  1. Apply base coat and let dry.
  2. Paint a thin layer of sheer/jelly polish on all nails and let dry.  I chose a combination of colors, but you could use one color for all of your nails.
  3. Apply glitter polish.  I used two glitters for more density, but you could use one or two coats of one polish.  Let dry.
  4. Paint another thin layer of base color over the glitter polish.  Let dry.
  5. Top coat and you're done!


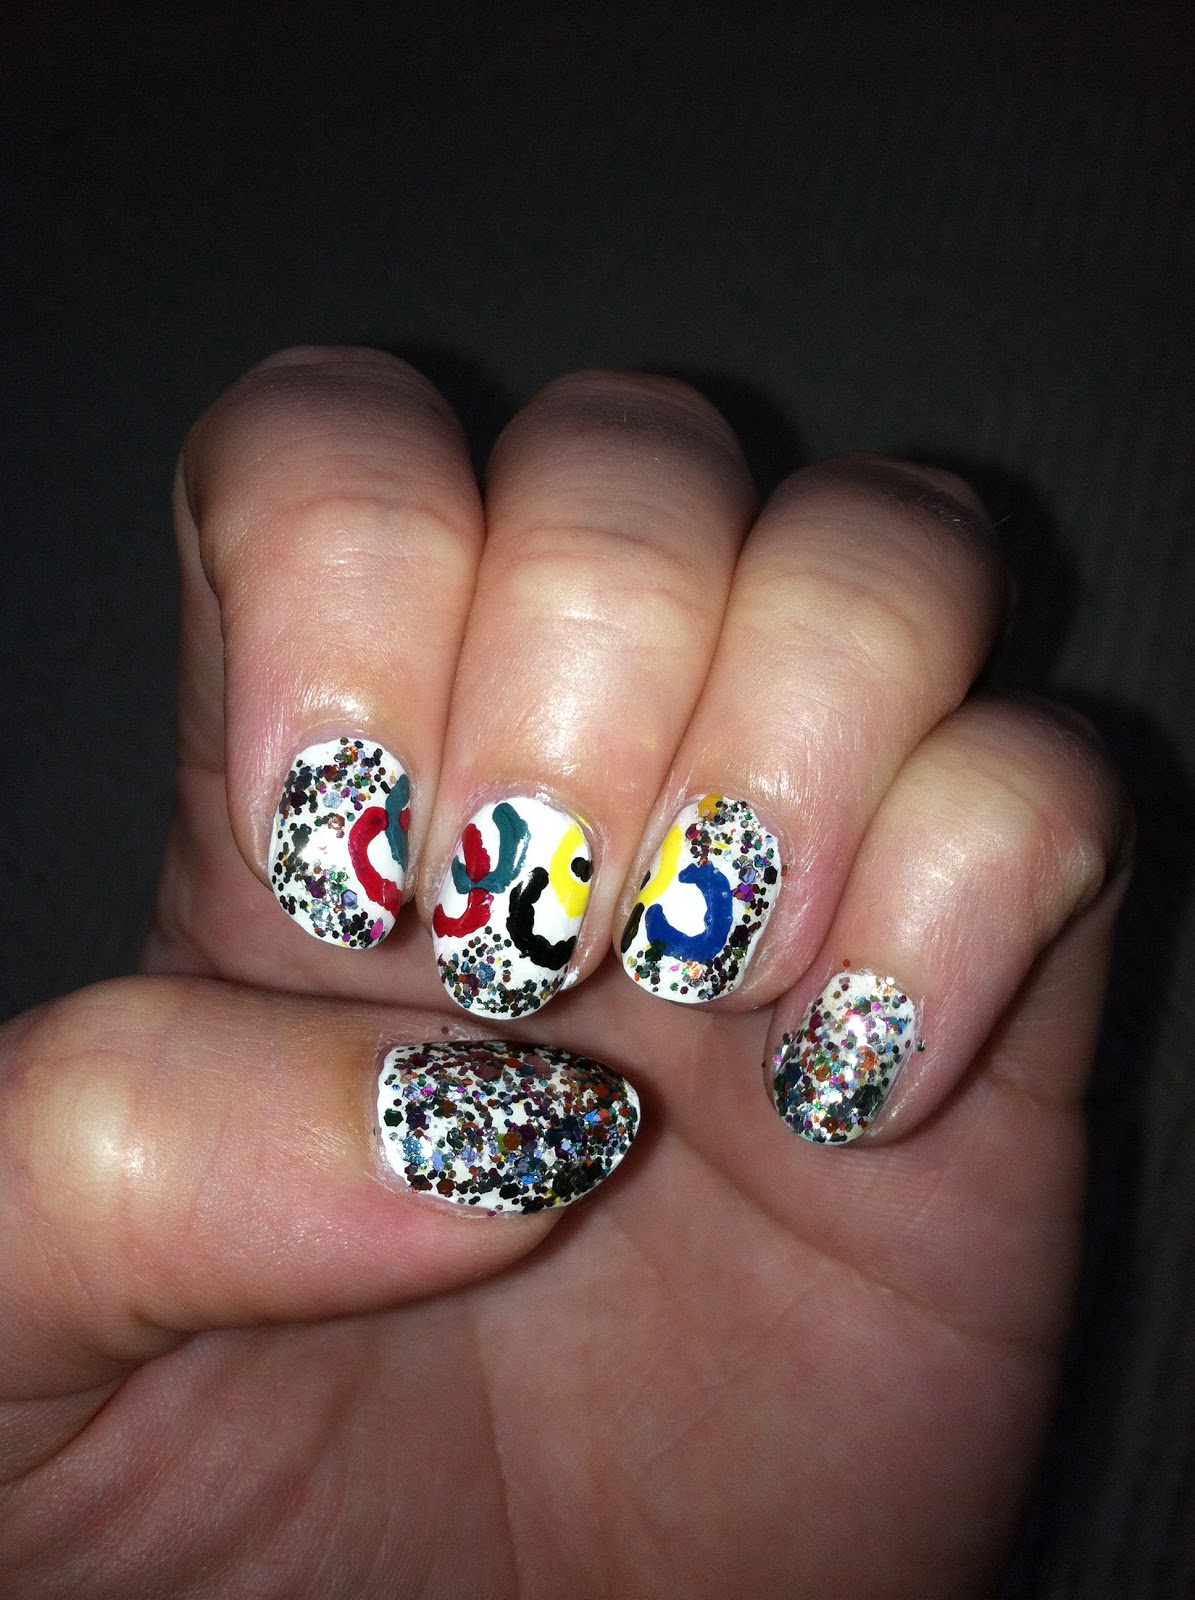
As you can see, the different polishes I chose have different opacities.  I personally like how the neon pink nails turned out better than the other colors because of how sheer the pink is.  The jelly sandwich is a great way to spice up a basic manicure and to add dimension to polishes you might be bored with.  This manicure took me 10 minutes from base coat to top coat application and took about 20 minutes of drying time (due to all the layers of polish involved).  

I hope you're as excited as I am about this new adventure in nail art! Please become a member of my site and send ideas my way.  Follow me on twitter @dinarwhal and email 30minutenails@gmail.com with questions!  Happy manicuring!!

Monday, November 26, 2012

matte + black + metallic

Today I have two looks that take advantage of matte top coat.  I love mixing matte with metallics, especially matte black with metallics.


Here's a fishtail mani I did using Wet n' Wild Ebony Hates Chris and OPI Just Spotted the Lizard, and Essie Matte About You top coat.


The manicure I'm wearing right now is another matte/metallic combo using Essie Power Clutch and China Glaze Smoke and Ashes (from the Hunger Games collection).  


Up close you can see the contrast between the mattified grey polish and the shiny black polish.


The polka dots were done with a bamboo skewer.

What's your go-to combination?
 

Sunday, November 18, 2012

Back in the game?

Hello lovely readers.  It's been awhile and I wanted to share some of the things I've done since last spring (yikes!).  

This was back in March when I went to watch my sister swim at NCAA Division III Nationals.  Go Big Red!


I did this spotted manicure over the summer.  It's loosely based on Chalkboard Nails' Gradient Dot manicure .


Here are a series of American Flag manicures I did over the summer for 4th of July and for some concerts I went to.


I did this manicure for a friend's wedding in July to match my dress (the background of this photo).


This was a fun ikat look I came up with.


I obviously had to get my nails ready for Olympics viewing!

This was my first attempt at a jelly sandwich a few months back.


I'm hoping to start posting more regularly so keep checking back for what I hope will be a weekly manicure!  Happy Thanksgiving everyone!!!

Friday, March 16, 2012

St. Patrick's Day Skittle

I've got a super quick, extra green manicure to share with you today.  The skittle in today's title simply refers to the fact that I painted a different color on each nail!

Urban Outfitters Jerk (thumb), OPI Did It On Em' (forefinger), Color Club Twiggy (middle finger), Sinful Colors HD Nails (ring finger) and Sinful Colors Call You Later layered over Color Club Happy Hunter (pinkie).  


Enjoy!

Tuesday, March 13, 2012

"may the odds be ever in your favor"

If you haven't gotten caught up in the Hunger Games craze yet... you should! The series is incredible and is so much more than the silly YA series you might think it to be.  The movie version of the first book, "The Hunger Games", comes out next Friday, and China Glaze has come out with a polish collection to go along with it.  Each polish represents to one of the districts from the books, and they are all fantastic. I initially thought I wanted to get "Electrify", but, as usual, the swatches are quite different from the real life colors.  After I saw them in person I went with "Dress Me Up" (dark blush), "Smoke and Ashes"(black with a blue/green shimmer), and "Harvest Moon" (a rich, shimmery copper). 

For my first Hunger Games manicure I put on a base of "Dress Me Up" and used a bobby pin to dot on "Harvest Moon".  I can't express how much I love them, both separately and together.  "Dress Me Up" looks anywhere from muted beige to pink depending on the light, and is a versatile, natural color I would wear everyday.  "Harvest Moon" is very rich and metallic, and has great shine. 

With flash.  You can see just how metallic "Harvest Moon" is in this photo.

Under lamp light. Notice how different "Dress Me Up" looks here?


Needless to say, I'm smitten with all of my new polishes (and I wish I could have afforded to get the whole collection).  Keep an eye out for more Hunger Games projects to come!


Sunday, February 26, 2012

chalkboard nails contest entry

Happy Sunday everyone!  Today I'm sharing my entry for Chalkboard Nails' dotting tool contest.  Here's the look I created:


I used tape to create v-shaped patches on my nails and then used a bobby pin to dot on different shades of blue. Colors used: Essie's Coat Azure, Go Overboard, and Turquoise and Caicos, OPI's Fly, and Sally Hansen's Air.  I finished it off with Essie's Matte About You.  


Enjoy!

Monday, February 20, 2012

laissez les bons temps rouler

Happy Mardi Gras everyone!  Today (to make up for the fact that I can't be in New Orleans celebrating with friends) I created a Mardi Gras themed manicure using the traditional colors: purple, green, and gold.


I used China Glaze's Champagne Bubbles (gold), Milani's Purple Gleam, and Color Club + Refinery 29's Happy Hunter (green).  I put on two coats of gold polish and then used nail art brushes to paint on free-hand stripes in green and purple.


Enjoy!

Monday, January 23, 2012

boozy brunch and a mint sundae

Today I've got a special treat: a two-manicure post!  Both are takes on Nailside's awesome cloud manicure.  This wasn't my first attempt at her retro look, but the third time was definitely the charm for getting the technique just right.  


Here's look number 1: Boozy Brunch


The base is a new L'Oreal polish in "Boozy Brunch".  I then added in Sally Hansen's "Whirlwind White", Verity's "Yellow Follow", and OPI's "Strawberry Margarita".  As you can see, the clouds aren't quite even in their location or application in this look.  I went back and checked out the original before my next attempt: Mint Sundae nails!


The base of this look is Color Club's "Twiggy" with Sally Hansen's "Whirlwind White" and OPI's "Rainbow Connection" over top.   In my previous attempts I had tried to paint the "cloud" only on the corner of each nail, and they didn't look quite right.  By applying the three strokes across the entire tip of the nail the effect is bolder and looks more deliberate.   I'm glad I went back and checked out my inspiration photo before this manicure, because now I love my mint sundae nails!

What nails are you rocking this week?  Keep the comments and ideas coming!


Monday, January 16, 2012

movie star gone overboard

I took a trip to my local nail supply store today and grabbed some great new polishes.  Today's manicure features two of them: Essie "Go Overboard" and Verity "Movie Star".  "Go Overboard" is a  gorgeous deep teal color and is a part of Essie's Go Overboard - Spring 2012 collection.  Verity "Movie Star" is a mix of small, silver and larger, hexagonal pink and blue glitter in a clear base.  I found the brand in the back of my nail supply store, and, when I heard it was only $2 a bottle, I bought several!

I used "Movie Star" as an accent on my ring fingers on each hand.  The blue and pink hex glitter work really nicely with the deep teal of "Go Overboard".


With flash "Go Overboard" takes on a more blue hue.


Once again, with flash.


Natural light.  Here you can see the greener side of the polish.

What type of manicure are you wearing this week?  Comment back with your projects and any requests!

Friday, January 13, 2012

80's power suit barbie

Happy Friday everyone! I'm super excited for my 3-day weekend and I decided to celebrate with a bright (and easy) manicure based on a project I did over the summer I called "malibu barbie".

My attempt then...


and now!  


 I thought this one was a bit more sophisticated(?) and it reminded me of barbie at work!


To achieve this look I started with 2 coats of pink polish.  I then freehanded in diagonal patches of purple glitter.  I gave the look a little more finesse by covering up the break between the colors with a solid black line.  I used OPI Strawberry Margarita (bright pink), Milani One Coat Glitter - Purple Gleam (purple glitter), and Milani Black Sketch (black w/nail art brush).  

Enjoy!

Wednesday, January 11, 2012

butter london swatches!

Today I'm excited to share a manicure featuring two of my new polishes from butter london.  I'd been hesitant to try butter london's polishes because they are so pricey, but I ended up treating myself to one for the holidays.  Luck for me, some of my friends (and fellow nail polish enthusiasts) also got me three butter london polishes as gifts!!!  I'm thrilled to have them as part of my collection, but also afraid of how many more I'll now want to get!

Today's manicure features the polish I bought ("yummy mummy") and one of the gift polishes ("all hail the queen").  Both polishes are a subtle beige/neutral color.  They differ slightly as while "yummy mummy" is a regular creme polish, "all hail the queen" has a shimmer to it.  


You can see the slight sheen of "all hail the queen" here on the left.

I went with my go to simple manicure: all one color with an accent nail (my ring finger here).  I used "yummy mummy" for my all over color and "all hail the queen" as my accent.

I love the simplicity of this look.  I know I will be using these polishes a lot in the future! 

Enjoy!

Saturday, January 7, 2012

pretty boy swag

Happy New Year everyone! I was out of town for the holiday and did not end up posting my NYE mani, but rest assured...I used all of my sparkly/glitter polishes together and it was intense!  Today I've got another request: a manicure based on Soulja Boy's "Pretty Boy Swag".  If you haven't checked out the awesome music video click here and be amazed.

I decided to base the design on his clothing in the video, because I wasn't quite sure how to capture the lyrics (what does a condo look like in manicure form??).  I loved his pleated leather jacket, and I knew I needed to incorporate the appropriate amount of bling.  I went with black polish with matte stripes mixed with white polish and a chain decoration.  


 It's a bit hard to see the chain decoration here, but you can see the free-hand matte stripes I put over the black polish.


I reversed the pattern on my right hand.


A sloppy pic, I know, but you can get a feel for the chain a bit better here.  I used Wet N' Wild Ebony Hates Chris (black) and Whirlwind White (white), Essie Matte About You (mattifying top coat), China Glaze Icicle (silver) and Champagne Bubbles (gold), and Nicole by OPI Make U Smile (silver glitter).  I hope you enjoy!